HubLだけで作るカレンダーモジュール

目次
CMS Hubのウェブサイトページで、簡易的なカレンダーを表示できるモジュールの作成方法を紹介します。
CMS HubではHubL(HubSpot Markup Language)というテンプレート言語が使えるため、HubLで日付処理を行うことでカレンダーが簡単に作成できます。
HubL構文
https://developers.hubspot.jp/docs/cms/hubl
カレンダーの仕様
・モジュール化し、必要なページに設置できる。
・Javascriptは使わず、HubLとHTMLで実装。
・ページ毎にカレンダー内へ日の情報を入力、表示できる。
・カレンダーは複数月の表示が可能。
カレンダーモジュール作成
モジュール作成、フィールド設定
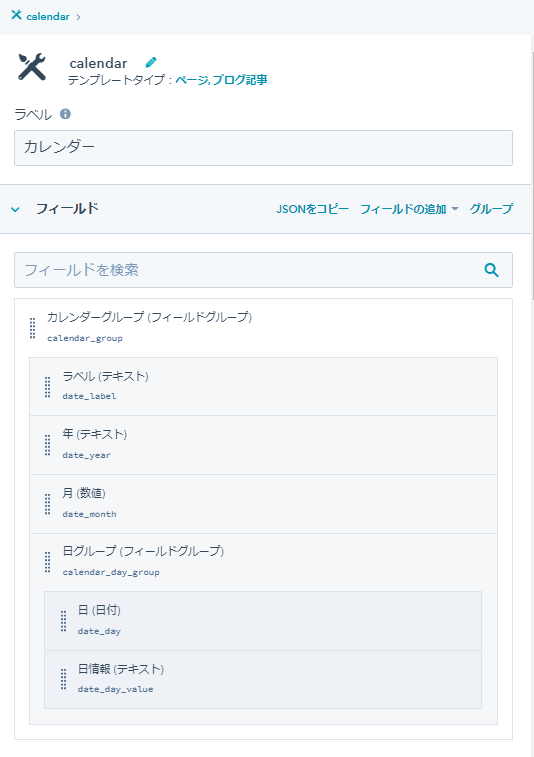
モジュールを新規作成し、以下のようにフィールドを設定します。
カレンダーグループ、日グループはリピートオプションを有効にします。

モジュールのソースコード
モジュールのmodule.html (HTML + HubL) へ以下のコードを記述します。
スタイルシートは適宜設定してください。
{# 曜日リスト 曜日, 曜日class #}
{% set wDays = {"日":"sun","月":"day","火":"day" ,"水":"day" ,"木":"day" ,"金":"day" ,"土":"sat"} %}
{# カレンダーグループ ループ開始 #}
{% for item in module.calendar_group %}
    <div class="calendar">
    {# 初期値 現在の年月 #}
    {% set nowYear = year %}
    {% set nowMonth = null|datetimeformat( "%m" ) %}
    {% set calYear = nowYear %}
    {% set calMonth = nowMonth|int %}
{# モジュールフィールド(date_year)から年取得 #}
    {% if item.date_year %}
        {% set calYear = item.date_year|int %}
    {% endif %}
{# モジュールフィールド(date_month)月取得 #}
    {% if item.date_month %}
        {% set calMonth = item.date_month|int %}
    {% endif %}
{# 月2桁0埋め #}
    {% set calMonth_f = '%02d'|format (calMonth ) %}
{# 対象月の1日のDateオブジェクト生成 #}
	{% set firstDate_str = calYear ~ '-'+calMonth_f ~ '-01T00:00:00+0000' %}
	{% set firstDate = firstDate_str|strtotime( "yyyy-MM-dd'T'HH:mm:ssZ" ) %}
{# 対象月の1日の曜日取得 #}
	{% set firstDate_w = firstDate|datetimeformat( "%w" ) %}
{# 対象月の末日計 #}
{# 1日の1ヵ月後の1日前が今月の末日 #}
	{% set nextMonthDate = firstDate|plus_time( 1, "months" ) %}
	{% set lastDate = nextMonthDate|minus_time( 1, "days" ) %}
{# 当月の末日の日を取得#}
	{% set lastDate_d = lastDate|datetimeformat( "%d" ) %}
{# 対象月の末日の曜日取得 #}
	{% set lastDate_w = lastDate|datetimeformat( "%w" ) %}
{# カレンダー開始空白セル数 #}
	{% set preCol = firstDate_w - 1%}
{# カレンダー終了空白セル数 #}
	{% set afterCol = 7 - lastDate_w  %}
{# カレンダー生成開始 #}
<h1>{{calYear}}年{{calMonth}}月</h1>
<table>
{# 曜日行出力 #}
<tr>
{% for key, val in wDays.items() %}
	<th class="day"><span class="th_{{ val }}">{{key}}</span></th>
{% endfor %}
</tr>
{# カレンダー開始空白セル出力 #}
<tr>
{% if preCol > 0 %}
	{% for p in range( 0 ,preCol ) %}
		{# 先月の日付計算 #}
		{% set preDay = preCol - p %}
		{% set lastMonthDay = firstDate|minus_time( preDay, "days" ) %}
		{% set calLastDate_d = lastMonthDay|datetimeformat( "%e" ) %}
		<td class="blank"><span class="date blank">{{ calLastDate_d }}</span></td>
	{% endfor %}
{% endif %}
{# カレンダーセル出力 #}
{% for d in range( 0,lastDate_d ) %}
	{% set cDay = d + 1 %}
{# 日0埋め #}
	{% set cDay_f = '%02d'|format( cDay ) %}
{# カレンダー日Dateオブジェクト生成 #}
	{% set cDate_str = calYear ~ '-'+calMonth_f ~ '-' ~ cDay_f ~ 'T00:00:00+0000' %}
	{% set cDate = cDate_str|strtotime( "yyyy-MM-dd'T'HH:mm:ssZ" ) %}
	{# 曜日 #}
	{% set cDate_w = cDate|datetimeformat("%w") %}
	{# フィルター用 年月日時分秒 #}
	{% set cDate_f = cDate|datetimeformat( "%Y-%m-%d %H:%M:%S" ) %}
	{% set dDate_val = "" %}
{# カレンダー日セル class #}
	{% if cDate_w == 1 %}
		{% set td_class = " class='td_sun'" %}
	{% elif cDate_w == 7 %}
		{% set td_class = " class='td_sat'" %}
	{% else %}
		{% set td_class = "" %}
	{% endif %}
	<td{{td_class}}><span class="date">{{cDay}}</span>
{# 対象日モジュール情報出力 #}
	{# 日グループから該当日の情報だけ取り出してループ #}
	{% for c_item in item.calendar_day_group|selectattr( 'date_day', '==', cDate_f ) %}
		{% set d_date_val = c_item.date_day_value %}
		<span class="date_val">{{ d_date_val }}</span>
	{% endfor %}
    </td>
	{# 土曜日で折り返し #}
	{% if cDate_w == 7 %}
		</tr><tr>
	{% endif %}
{% endfor %}
{# カレンダー終了空白セル出力 #}
{% if afterCol > 0 %}
	{% for a in range(0,afterCol) %}
		{# 来月の日付計算 #}
		{% set afterDay = a + 1 %}
		{% set nextMonthDay = lastDate|plus_time(afterDay, "days") %}
		{% set calNextDate_d = nextMonthDay|datetimeformat("%e") %}
		<td class="blank"><span class="date blank">{{ calNextDate_d }}</span></td>
	{% endfor %}
	</tr>
{% endif %}
</table>
{# カレンダー生成終了 #}
</div>
{% endfor %}
{# カレンダーグループ ループ終了 #}
ウェブサイトページでのカレンダー設定
ウェブサイトページの編集画面で作成したカレンダーモジュールを追加します。
.png?width=1516&name=2022-06-23%20(5).png)
カレンダーグループを追加した後、カレンダーの設定を行います。
・ラベル 編集後判別しやすい名前を入力(2022年7月)
・年 カレンダーの年(数値4桁 2022)
・月 カレンダーの月 (数値 初期値1)
年、月を設定すると右に表示されたカレンダーがリアルタイムに変更されます。
.png?width=755&name=2022-06-23%20(7).png)
日情報の登録
カレンダーグループの日グループを追加し、カレンダーに表示する日、日情報を登録します。
・日 カレンダーに表示するの日付を選択
・日情報 表示する内容
右のカレンダー内にリアルタイムで情報が表示されます。
.png?width=755&name=2022-06-23%20(8).png)
カレンダーの追加
カレンダーグループを追加することで複数月のカレンダーを表示できます。
.png?width=1516&name=2022-06-23%20(9).png)
今回は年月を指定してのカレンダーを作成しましたが当月、来月を自動で表示するカレンダーもこの応用で作ることができます。
以上、CMS Hubのウェブページにカレンダーを実装する方法のご紹介でした。
掲載したモジュールのHubLソースコードについては、不具合などある場合があります。
ソースコードをご利用される場合、自己責任でご利用ください。
HubSpotの活用にお悩みを抱える方へ
JBNはHubSpotの導入支援やAPI連携、システム開発も得意としています。
「HubSpotを便利に、効果的に使いたい」とお悩みの方はお気軽にご相談ください。
JBNについて(資料ダウンロード)
JBNはHubSpotを活用して多くの企業様のWebサイト構築や運用、マーケティング活動を支援しています。ぜひ資料をダウンロードしてご覧ください。

資料内容
- JBNのサービス概要
- JBNの支援実績
- マーケティング施策の事例